going for gloss
i got two messages asking how i did my gloss finish so here it is. i also put more thought into this than what i sent to those guys which was hastily written. so zig and marion this is the best explanation i can come up with.
i left off after priming so if you havent read that part yet, better do so now. let your hands rest first after all the sanding before you start spray painting.
so your shell has been primed and smoothed with putty. time to get some lacquer paint. this is the part where it gets expensive. i used spray cans to apply the color and the clear coat. i used only one brand, pylox because its cheap and consistent. i know some might think that i should have used a compressor/HVLP system but i dont have a compressor or HVLP gun. now that will be a sizeable investment for a one time project dont you think?
i used two cans of pure white (no. 100) , two cans of flourescent pink and two cans of clear already for the 12" and 13" toms. i think i need 4 more the 16" tom and bass drum plus 3 pink. the clear coat, now that's expensive, i estimate about 6 cans for the two remaining drums. all in all, you get 6 cans of pure white, 5 for pink and 8 for clear coat for a total of 19 cans multiplied by 140 pesos. well you get the idea. at least i dont have to clean up anything as opposed to using a gun and compressor.
you'll also need several grits of sand paper, personally i choose 400, 600, 1000, 1500 and 2000. there other guides out there that will give you a different configuration but this worked fine for me. they will all be used for wet sanding.
there are several things to remember:
- i found out the hard way that you cant use lacquer over polyurethane, the lacquer will react with the poly making the coat bubble like crazy and leave a flake finish when dried. dont ever use polyurethane over lacquer as poly will leave a yellowish tint when you apply it and still be there when it dries. i havent tried non-yellowing polyurethane yet but as a simple rule of thumb: use lacquer all the way, poly vice versa, dont mix them.
- dont apply more than 2 coats a day for lacquer. i tried to apply 10 coats in one whole day and when the lacquer dried, it shrank leaving me with stretch marks on the surface of the drum. good thing the stretch marks were covered when i installed the snare head. 2 coats a day is on the safe side, i do one coat in the morning before i go to the office and one coat when i go home. simple rule.
- when using lacquer, do it in a properly ventilated area, it smells bad and is bad for your health. but dont spray lacquer on a dusty place or non-cemented ground. you dont want dust particles to stick on the lacquer as it dries.
i learned all of these reminders from the school of hard knocks. as i mentioned before, i dont know any better about painting but at least now i do.
before you start painting, make sure you have something to hang the shell with. you need to go around the shell so you need it to be mobile. i used cymbal stand covered it with newspaper. i hung the shell like so:

of course you cant spray on the whole perimeter of the shell this way with one pass. i had to rotate the shell four times.
on my first attempts, i did used a lazy susan. its nice and fast if you want to apply paint on the whole shell but i found it difficult for making edge fades. i just found it comfortable to do the fade with the shell vertical. i dont know about the others.
lazy susan is not a person, its the small rotating platform on top of those big dining tables. you can make an improvised version using two panels of plywood nailed loosely on the center or you can buy the metal ring from ace hardware/handyman/true value.
now that we are all setup, its time to spray on the first white coat. i did 2 coats per drum ensuring it is applied thinly and that the can is 8" away from the shell. white is the standard choice for first coats because it will allow your (future) color coats to really bring out their best shade. some spray cans will instruct you to hold the can about 12" away but i found this too wasteful. 8" is as near as you can get for a good coat with minimal waste and no paint runs.
applying the white paint is easy, just go around the whole shell. now let's do the fade. i dont have a pic of me applying the paint so here's an improvised pic on where to position the can when doing the fade:
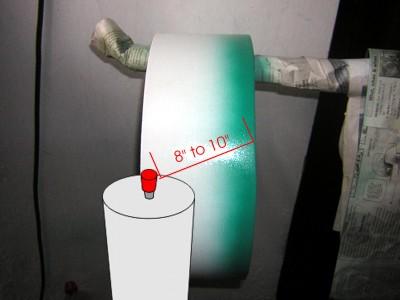
i positioned my spray can about 8 to 10 inches diagonally from the opposite edge of the shell. a couple more inches farther and you'll get unwanted color mist over your white background. i did two light coats to achieve the green fade.
to increase the fade color's width (similar to the pink finish), just aim inwards maintaining the distance and angle of the can.
when you are finally satisfied with your color, the next step is to protect that with clear coats. this series of repeating steps will determine a glossy finish or a crappy one. its quite simple but tedious. apply 3 coats of clear first and then wet sand it with 400 grit. dont rub the clear too much or you might destroy your finish color. too much is when you look at your sand paper and you see the paint you used on it. remember the goal is to remove bumps/high spots and level the lacquer by sanding.
after wet sanding the first 3 coats, you'll see portions where there are dark spots. these dark spots are natural and its what we want to remove anyway. now get your clear spray can again and do 3 more coats then wet sand it again with 600 grit. just do 3 coats and then wet sand it with the next higher grit. when you get to 2000 you wont hardly see the black spots you've seen after the first 3 coats. what you'll get is a smooth surface full of fine scratches that it makes the shell look dull, non-glossy, just plain boring. leave it that way for 1 month.
this is the lacquer curing stage, some might argue that lacquer doesnt really cure, what the heck am i talking about? im simply saying that you should let the lacquer harden for a while. how do you know if its already cured/hard? simple, if you dont smell the lacquer anymore then its cured. it takes about a month. dont attach the lugs yet during this wait period, dont play your drums or you will waste all your money and effort.
after 1 month, get yourself some swirl remover and carnuba wax. buy it from the big hardware chains on the malls or if you have a neighbor with a car, ask if he has some. i use turtle wax swirl remover and carnuba wax. apply swirl remover on your shell and it will give the gloss to your dull, lifeless shell. satisfied yet? finally apply the carnuba wax to protect the gloss. attach your lugs, the head and the hoops.
badabing badaboom that's the it!
posted by D` Pimp @ 2:55 PM
0 comments
![]()


0 Comments:
Post a Comment
<< Home