my first tom shell
ok, the pics are 5 days old but better late than sorry...whatever?!
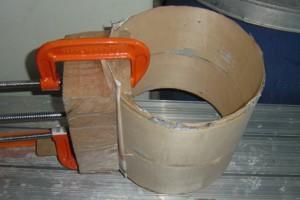
the first one shows the finished shell clamped on the mold. i left it like that longer than usual. its been sitting there overnight.
the next one shows me trying to remove the clamps, what a thrill. boooooo.

now im measuring the thickness by using a caliper style meter thingy. its more than 5mm but less than 6 mm, i say its perfect just as computed!

so i got the shell off the mold, the magazine page was glued on the shell seams. i find it easier to clean the shell later with sand paper than to allow the shell to stick to the mold.

now here's the mold, still usable for a few more 10 inchers, its kept clean by the clear packaging tape i put on it.

and now here's the shell, its been cooking for a couple days now in my improvised oven. actually its not really an oven, its the car compartment. i did this to make sure that the glue is all dry and hard.

PS: before you make your shell, buy a car first so you can have your own personal oven too. nice huh
to sum it all up
mold
- 1 hour to cut the blocks
- 2 hours glueing
- 24 hours for letting the glue harden
- 277 pesos for 2x4x8 wood
shell
- 5 minutes to compute lengths
- 1 hour to cut the plies into exact sizes and stick them side by side using masking tape
- 5 days of glueing all the nine plies together. it took more time for clamping the actual work involve which i can peg at about 6 hours total.
- 567 pesos for 7 strips of 4"x9' raw maple veneer, i used 5 only.
- 84 pesos for the pva wood glue
cant wait for tomorrow, im going to take it to the wood shop and have them cut it to size because im lazy to do that manually. this is as far as this shell goes, it wont be a finished drum. still waiting for my 4'x8' sheets of veneer though, cant begin on the new 10" and the rest of the kit.
posted by D` Pimp @ 10:56 AM
0 comments
![]()


0 Comments:
Post a Comment
<< Home