my full kit begins today
so i did drive down to north harbor to pick up the veneer. man its been a long time since i last came there, i forgotten how far it was. i reached the aboitiz 2go warehouse at 9pm.
now i understand why alwana asked for a thousand bucks for packaging the veneer. they sandwiched it between plywoods. lucky for the guys at 2go, i couldnt bring the plywoods with me so i gave it to them. i just rolled the veneer and threw it in the back seat. hey it was getting late, raining, havent eaten dinner yet so i wasnt thinking straight and just gave away that 1k. anyway its fine as long as my package came in safe and sound, that's all that matters, the plywoods served their purpose.
here are the 4 sheets tucked away in my empty practice room.

know what, i could've gotten away with what i did on my first tom. alwana sliced the wood and then they put them side by side, just like what i did before. anyway its fine, they did a better job at cutting them straight and less work for me.
when i woke up at 6, i immediately started to cut the layers for the new 10". the ply configuration im going to do this time is HHVHVHVHH unlike last time which was all horizontal.
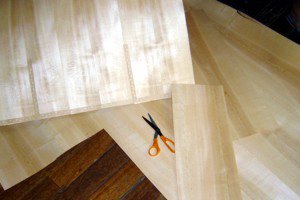
how i wished i didnt give away my old trusty t-square from my college days. it would have helped a lot in marking. as for cutting the sheets, i used a plain scissor. it would take too long to use a cutter and would be overkill to buy a veneer cutter. besides i can cut straight lines with a scissor not to pat myself in the back but yeah i cut damn straight.
after cutting the first two inner layers. i immediately set out to clamp them together. as the clamping time is mostly about waiting, i find something better to do in between. i got the mold, the remaining glue, the putty scraper, two clamps and two pages of glossy magazine. the inner sheet is cut to the exact length as i discussed before. that goes on top of the longer sheet.

my first attempt at glueing the first two sheets together was a disaster, i learned from that so this time i taped the two sheets together on one side so they dont move around when i apply the glue and start clamping.

then i applied glue to the section in the middle where the bottom ply meets the top ply's one end.

i used the scraper to evenly distribute and spread the glue. sorry no pics for that coz i got to work fast or the glue will dry.
then i pushed to bind the two plies together on the mold.

put the top of the mold over.

then clamp tight

previously, i followed the wait time as instructed on the back of the glue cylinder. it says 30 minutes of clamp time but this time im gonna a full hour before i remove the clamps. i encountered bubbles on some parts of the shell where i only clamped for that short time while some parts are even and tight. those parts are the ones i left overnight or when im at the office.
here's the last pic for today, maybe for the rest of the month. the digital camera that im using is going to be returned later in the afternoon. anyway its not a loss since most the things i'll do were already documented.
this is the inner ply closed to form the cylinder.

im starting the 18" tomorrow. i dont have enough floor space here to cut the veneer so im going to my girlfriend's house and do the cutting for the 18" and 14" there.
posted by D` Pimp @ 10:51 AM
0 comments
![]()


0 Comments:
Post a Comment
<< Home