Thursday, September 29, 2005

raketship.com is online!

although not really... i dont have a website yet.

raketship.com will be my portfolio of web and applications projects and hopefully will feature some works of my graphic designer friends. i intend to develop it to become an online bidding ground for projects in the near future and as a pinoy developer forum.

Wednesday, September 28, 2005

patching holes

i patched the tom mount holes and on the bass drum. since im also upgrading the bass drum spur from the old in-shell mount version to the "pro" retractable one, i also patched the spur holes.

first thing i did was to look for scrap lumber. i then cut them to shorter lengths and used a swiss knife to carve the shape that will fit the hole.


you dont have to do any measurements, just trim it down until it fits snugly on the hole. its just trial and error.


do that a couple of more times until you fill in all the big holes. i then mixed my favorite wood glue: pioneer powder resin + 1/10 water combo. not sticky, not messy, easy to apply but very long to dry. make sure you apply the glue around the edges too to maker sure there are no gaps along the contact points.


then wait for the glue to dry, i usually wait a full 24 hours before touching the glue. so after 24 hours i then proceeded to cut the excess parts of the hole plug both outside and inside. here's a pic of the outside. i always start from the the outside using a jig saw. its stanley and i used it before to cut holes for speaker cabinets before i got an electric version.


then do the inside. this is much more difficult to do than the outside. remember im going to apply paint on the inside of the shell so i dont care much if i scratch the inside wood with the jig saw.


then i do the screw holes using smaller pieces of wood with my trusty swiss knife, glue and wait for 24 hours again. cut the excess, sand the surface and then voila!


next step, priming!

Tuesday, September 27, 2005

maple veneer in taguig

dang its pay day tomorrow. this means i'll have funds again to buy bling blings. i hope i can finally visit ama kd world in taguig to look at the raw maple veneer they have. i intend to build a 10" tom using their 0.5mm veneers. i havent seen the sizes yet and i wish i wont be disappointed like when i looked at formaply's veneer.

if all is well then its to the lumber supplier for me, i gotta get me some thick MDF and create my mold. but then again, i dont want to set my hopes up too high.

bass and floor tom ready for priming

been busy with work these past few days. yes i actually work in the office. sometimes...

i got the 12" and 13" 'pinked'. the 12" had its first wet sanding last night and the 13" had its second clear coat. the way i figure to have a gloss finish is to put 3 coats of clear then wet sand it using 1500 grit. put another 3 coats and wet sand again with 1500 and do this two more times. im doing this to really level the clear coat as even and smooth as possible. for the final wet sanding, i'll top it off with 2000 grit. so that makes a total of 12 clear coats per drum.

i also plugged the holes on the bass drum last night and i will be able to post pics tomorrow on how i did it. the next step is to apply primer on the floor tom and bass drum, make the surface smooth and even by using a couple coats of putty and sanding. finally, spray the colors and clear coat.

Thursday, September 22, 2005

from wrap to fade

well here's a group pic. wish i had a pic of my drums set up before i removed the wraps. oh well, here they are from wrapped to the new finish.


i finished the first coat of flourescent pink fade on the 12"


and 13" tom being wet sanded for preparation for its first white coat last night. been busy eh


i use the 3M sanding block to apply even pressure. you can really find the low spots using this simple tool. of course you can use a simple wood block as backing for sand paper but hey, why not do sanding with style right?

drum wrap removal

last night i removed the wrap on my 16" floor tom =)

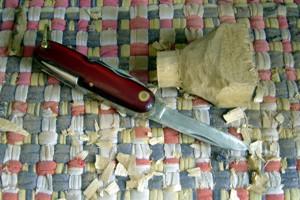
i can finally start blogging the whole process so let's begin by removing the wrap on this one shall we? i have the following tools to do the job: long nose pliers, a screw driver to remove the lugs, a 1" chisel or scraper and a clear space to work on.

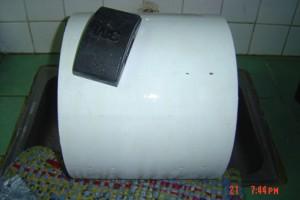
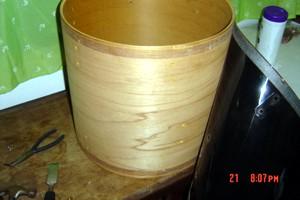
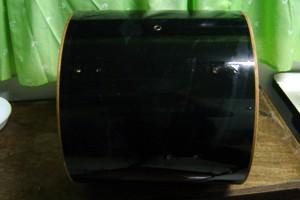
now presenting my 16" tom


the first thing i did was to remove the eyelet vent by using the chisel to pry the sides and then used the long nose pliers to squeeze it to the center. you'll never going to use the eyelet again so dont be gentle with it, totally disfigure and destroy it to make its removal easy. in the end, i only need to push it downwards with the pliers. it might be very difficult for you to pull or push it with the pliers so use a big nail and hammer it from the outside of the shell.


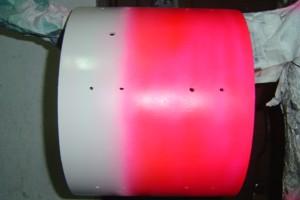
now look lets begin unwrapping the shell. look for the seam of the wrap. use a chisel, a scraper or any flat sharp object to pry the wrap. do this gently on the start of the seam to avoid any untowards peeling of the wood.


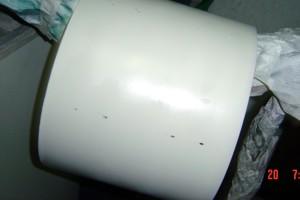
here's another view. notice that only the start and end of the wrap has adhesive from top to bottom. normally, they use high bond double adhesive tape on the wraps. if the wrap is glued to the shell then your screwed big time!


carefully push the chisel to split the wood and the adhesive. dont pull the wrap!


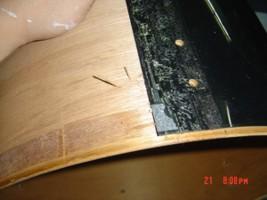
just in case you are wondering why you shouldn't pull the wrap, here's an example:


splinters, now you dont want that. it makes finishing a little more difficult. of course you can always fix it but why go the extra step? i only intentionally done that to illustrate the point.

here's the shell with the wrap removed half-way:


and now the unwrapped shell


you have to sand the shell to remove any remaining adhesive and then start the painting process...more on that later.

Wednesday, September 21, 2005

cracks, holes and fixes

the 13" shell is the ugliest of the bunch and the most problematic too. there is large crack that's there ever since i bought it and made the shell out of round. mmmmm ugly


here's a pic of the covered hole where the pearl-type tom mount used to be. you can see a 1" hole and 3 smaller holes covered by wood and glue.


why cover the holes? because as i said before, i got the pulse pro rims-style mounts from vinci a couple of days back and its a shame to use it on a shell with holes. i'll provide step by step pics on how to cover holes when i do the bass drum. watch out for that.

you can also see the vent in line with the tom mount hole. i will increase its diameter to 1/2" so that the screw vents i ordered will fit in.

the insides of the shells will also be painted white so nobody will see any crack, patch or the butt ugly wood.

these shells need a lot of work before you can spray over them. the wood is very absorbent so you have to put primer on it and then level it with plasolux putty, sand and level, sand and level. sand and level a couple more times and ugghhh you're done.

Tuesday, September 20, 2005

PICS finally!

this cant wait till morning.

i've added some pics on my earlier posts so enjoy!

ghostnote to drumshed, WTF?

ghostnote went online a couple of days ago but under a different moniker, its now drumshed.org. it seems the administrators had a cat fight over ownership or something but anyway, its nice they put it back online.

more reason not to work! wuhoooooo

finally, a digicam

well i drove to bicutan last night to borrow my cousin's 5MP sony digicam, finally i can take pics!

oh yeah, i also got to work a lot on my 12" and 13" last weekend. the 12" is ready for its first coat of white spray. i'll probably do it tonight. the 13" needs one more round of patching and sanding.

i have to peel the wraps from the 16" and 22" too, better get busy.

*added 9/21/2005

my 12" drying after the first white spray coat


now here is my 13" tom after primer, still not smooth enough for the white spray coat


and finally my 16" tom and bass drum waiting to be peeled off

Wednesday, September 14, 2005

update

no work done for the 12" and 13" but i did get an oil change, tune up and the power window of the car now working.

i cant work on the toms tonight because i have to review for my mcad cerfitication exam tomorrow. =(

Tuesday, September 13, 2005

the rain, car problems, mind undecided

its been raining all night last night and the car's driver side power window decided to stay down and wont go up. lucky for me that its not raining along sucat onwards to susana heights and back. so instead of finishing the 12" and 13" toms, i ended up with my hands sore and a slight cold while trying to remove the door panel of my car. i was trying to pull or push the window glass back up but after 3 hours of trying, i did not suceed.

i cant make up my mind if i still go with acrylic or maple keller...

Monday, September 12, 2005

killing time

a couple more minutes and the non-office hours officiallybegin. im very excited today because my month long anticipation of my new salary will end in a couple of hours. i plan to sit it out near an atm machine and wait till its 12:01AM to get first glimpse and first withdrawal =).

i can finally order the 3 acrylic shells for my new 'small time' drumkit with yellow powder coated hardware.

wishful thinking again.

powder coating - versa metal industries

i dismantled the floor tom and bass drum last saturday with the help of the gf. i brought all the lugs, bass claws, hoops and my new bass drum spurs to versa metal industries for powder coating. the old cheap chrome plated thingies will be covered with white powder. this bling will add shinizzle to my maya. i will pick them up next saturday.

meanwhile, i finished sanding the 12" and 13". the two toms have a lot of gaps and cracks so i used plasolux putty to fill them. i just finished the second coat for the 12" this morning. i think i can finish the 13" tonight after i drive the gf tonight to muntinlupa. then i have to sand them again, apply another coat again, sand them again, coat them again....

i haven't started on removing the wraps on the floor tom and bass drum yet but i wish i took some "before" pictures for comparison after this pimping session.

one more thing, i also included the 14x6.5 metal snare shell for blue powder coating. it was the stock snare that came with my maya kit. i stopped using it after the strainer broke down about two years ago and after i got my 14x3.5 fernando piccolo. im having problems looking for a replacement strainer though.

i found versa on eyp.com.ph under the powder coating contractors listing, if you want to contact versa:

danny velasco (powder coating dept head)
versa metal industries
189 haig st., daang bakal, mandaluyong
tel. no. 5316267

just go to kalentong going to san juan, turn left at the second street from shaw.

* added 9/21/2005


here they are! all the lugs, hoops and floor tom legs are in that box and it cost me just 524 pesos! wuhooooo

Friday, September 09, 2005

ghostnote ghosted

darn the ghostnote forum is down. hacked again?

im soooo bored and now that ghostnote is gone (not sure if its coming back) what am i going to do? i have to look for another forum to spend my office hours with!

ooops my bad :)

Thursday, September 08, 2005

pimp my maya

did i say this was going to be a picture-filled blog? yes? no? oh well i dont have a digital camera at the moment.

should i build a 3-piece acrylic kit or get with my dream kit of 4 toms and a 20" bass drum. this is bugging me since may of this year and still could not really finalize anything. i am leaning on building an acrylic set but the shells are expensive. anyway i'll surely rack my brain and my pocket on this once i get the money to buy them.

in the meanwhile, im pimping my 5-piece maya kit. its nothing special really, its an entry level kit with black wrap, crappy wood and faded chrome hardware. i ordered a 12" and 13" rims-style mounting from vinci (the first dude i have the pleasure of meeting on the pinoydrums group) and got my hands on them just last saturday. i tried them on and those toms sounded REALLY nice so im going all the way and plan to refinish the kit with gloss lacquer to match the white-pink fade snare drum.

i already started on the 12" and 13" by removing the black wraps last monday evening. damn those shells are ugly on the inside. the 13" has a crack on the outer shell which was repaired with wood glue and then they slapped the wrap over it. if i knew then what i know now, i would never had bought that kit, quality assurance suck. well i cant really complain coz i got it brand new for 7500 pesos from jb music about 7 years ago, its cheap and you get what you pay for. . .

anyway, since im going to use the new rims-compatible mounts on the toms, its only logical to cover the holes of the previous pearl-type tom mounts. i first tried to get pros to do it, i went to 3 sash/woodwork shops and nobody wanted to do it. they said it couldn't be done. say what?! WTF? i just wanted them to cut a 2x2 lumber, taper it by using a planer into a dowel that will fit the holes. willing to pay. i just want it done faster. no deal.

if you want something done best, its best to do it yourself, so they say. im not really good with a planer so i used a swiss knife to create the round dowels to plug the holes with. i used pioneer powder-based wood glue to permanently hold the inserts in place. its strong stuff and it serves as wood filler too. its already dry but i dont want to cut it yet because i have to take pics first.

i'll borrow my cousin's digicam first, dont go away, be back later. . .

Wednesday, September 07, 2005

my first snare - born sept 3 05

i just completed my first snare drum last saturday (sept 3). its a 14"x5" Keller maple shell with white and flourescent pink fade lacquer finish. the lugs, snare wire and shell were ordered online from DSH (www.drummaker.com) while the hoops and strainer where bought cheap from Lazer at SM Manila.

boy do i have quite a roller coaster ride trying to finish it. i only have a couple of pics while i was painting it and i was not able to fully photo document the process because i dont have a digital camera.

i wish i had a digital camera...

* added 9/21/2005


believe me when i say that this image doesnt do justice to the finish. the flourescent pink is just ridiculously difficult to capture on the camera

Tuesday, September 06, 2005

welcome to the mis-adventures of the drum pimp!

this is a picture-filled, heart-pounding, head-splitting, nerve-racking and boring blog dedicated to like-minded individuals who own an entry level drum kit and wish they have something better. i will show you how to add bling to your taiwan made drums and believe me friends when i say to you that this is a money-draining exercise not for the faint-hearted.

nuff said!