Monday, October 31, 2005

festival mall shopping

was at festival mall earlier and happen to pass by at lazer. i got 26 yamaha style lugs, a pair of both 10" and 18" hoops. they have the 14" hoop with 6 lugs but its really thin and its quadruple flanged. i got the lugs at 35 each so it was really a bargain i couldnt pass up. i still need 14 pieces and i think i need to pay a visit to lazer ali mall or sm north edsa coz their metropolis and sm manila branches dont have them.

Sunday, October 30, 2005

vertical plies are a betch

been having some problems with the added vertical plies, they are proving to be a bit of a challenge and a headache. everytime i try to remove the clamps, i get air pockets and not some teeny weeny spots but whole areas going from the top to bottom. i have to scrape the glue and then redo it again.

i got 'betch' from chona in the city, i miss that blog!

Saturday, October 29, 2005

my full kit begins today

so i did drive down to north harbor to pick up the veneer. man its been a long time since i last came there, i forgotten how far it was. i reached the aboitiz 2go warehouse at 9pm.

now i understand why alwana asked for a thousand bucks for packaging the veneer. they sandwiched it between plywoods. lucky for the guys at 2go, i couldnt bring the plywoods with me so i gave it to them. i just rolled the veneer and threw it in the back seat. hey it was getting late, raining, havent eaten dinner yet so i wasnt thinking straight and just gave away that 1k. anyway its fine as long as my package came in safe and sound, that's all that matters, the plywoods served their purpose.

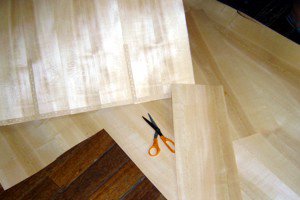
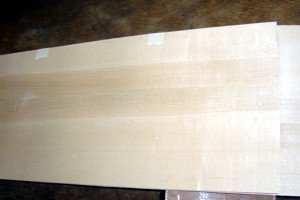
here are the 4 sheets tucked away in my empty practice room.


know what, i could've gotten away with what i did on my first tom. alwana sliced the wood and then they put them side by side, just like what i did before. anyway its fine, they did a better job at cutting them straight and less work for me.

when i woke up at 6, i immediately started to cut the layers for the new 10". the ply configuration im going to do this time is HHVHVHVHH unlike last time which was all horizontal.


how i wished i didnt give away my old trusty t-square from my college days. it would have helped a lot in marking. as for cutting the sheets, i used a plain scissor. it would take too long to use a cutter and would be overkill to buy a veneer cutter. besides i can cut straight lines with a scissor not to pat myself in the back but yeah i cut damn straight.

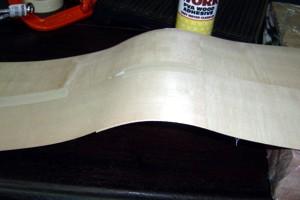
after cutting the first two inner layers. i immediately set out to clamp them together. as the clamping time is mostly about waiting, i find something better to do in between. i got the mold, the remaining glue, the putty scraper, two clamps and two pages of glossy magazine. the inner sheet is cut to the exact length as i discussed before. that goes on top of the longer sheet.


my first attempt at glueing the first two sheets together was a disaster, i learned from that so this time i taped the two sheets together on one side so they dont move around when i apply the glue and start clamping.


then i applied glue to the section in the middle where the bottom ply meets the top ply's one end.


i used the scraper to evenly distribute and spread the glue. sorry no pics for that coz i got to work fast or the glue will dry.

then i pushed to bind the two plies together on the mold.


put the top of the mold over.


then clamp tight


previously, i followed the wait time as instructed on the back of the glue cylinder. it says 30 minutes of clamp time but this time im gonna a full hour before i remove the clamps. i encountered bubbles on some parts of the shell where i only clamped for that short time while some parts are even and tight. those parts are the ones i left overnight or when im at the office.

here's the last pic for today, maybe for the rest of the month. the digital camera that im using is going to be returned later in the afternoon. anyway its not a loss since most the things i'll do were already documented.

this is the inner ply closed to form the cylinder.


im starting the 18" tomorrow. i dont have enough floor space here to cut the veneer so im going to my girlfriend's house and do the cutting for the 18" and 14" there.

Friday, October 28, 2005

a very happy day indeed

ok just got word that my veneers came in yesterday from cagayan de oro. i cant wait till tomorrow so im picking them up tonight after office at pier 18. the aboitiz warehouse is open 24 hours so lucky me, i wont get a restless sleep tonight in anticipation for tomorrow.

what a better way to start long weekends on a pay day friday!

simon philips clinic

simon philips here, actually yesterday, i wouldnt miss it for the world! i brought a digital camera but forgot to charge the batteries =( really dumb of me.

possibly the longest wait in line i spent for a clinic. been standing outside since 4:00PM with a friend and we were allowed in at ten past 7. i was very hungry and my feet are getting numb. we took the nearest seat on the left side of simon's drum kit just to get a better view of the master at work.

vic mercado started off the night with his band bamboo playing two of their tracks with vic doing a solo on the song 'as the music plays'. great drummer, his cymbal work is very impressive. i noticed he was using a clear acrylic snare. gotta get me one of those for xmas =) i see another project coming.

well i've never seen simon philips in the flesh before, i've only seen him on dvd and an old vhs tape titled 'super drumming' which i bought from rj galleria. i almost went to the toto concert at aliw theater feb of last year but unfortunately money was tight and tickets were expensive. i really imagined he was a big guy because of the height of his cymbals and the dimensions of his kit, well what do you know, he's just like mangini the year before and with wits to match. foreign artists never get to bring their gear along for clinics, how i wished that he had his green starclassics coz that would really be a sight to see. the first song is an instrumental unfornately im not really into his fusion projects so i dont know the two tracks he played. he did do the trademark round house fills with thunderous execution and demonstrated polyrhythmic stuff with his hands and feet. i was expecting a 45-minute solo but i guess due to time constraints, he only gave a 15-minute one. the dynamics and control he displayed was simply amazing.

come q&a time, i was no longer feeling my earlier hunger. he started answering questions from the crowd and then he demonstrated some warm-up exercises. seeing that makes me wanna quit practicing. i wonder how many years it would take me to be as precise as he is? hmmm he even did a paradiddle with his foot doing the same with his hands in half time. sic. reminds me of thomas lang but lang's is lot sicker since he does it with varying tempos. simon gave advice on recording drums, muffling the bass drum, some life stories and life in the recording industry.

got to go, i have an early meeting.

Tuesday, October 25, 2005

shipping confirmed

yahoooooooo my veneers are going to be in manila this saturday. just got a call from alwana and they are shipping it out today via aboitiz.

well that's it, the cost breakdown:

1600 per 4'x8' sheet - 4 pieces
1000 for packaging <- absurdly high, i wonder what kind of packaging they did that cost so much
377 shipping from cagayan de oro to manila

so far so good. i hope i wont incur unexpected "payments" when i go pick them up.

Monday, October 24, 2005

still waiting

no significant updates for me yet except that i finished the 18" mold yesterday. i dont have a budget to purchase spray cans so the refinishing is on hold again. my veneer is still in cagayan de oro, hope to get them this week.

i broke a heavy duty clamp while glueing the mold. its time to drive to federal hardware to grab 8 more. i want to do the 3 shells simultaneously so im going to need as many clamps as i can buy.

on a special note, smart delivered my wi-fi equipment yesterday morning. i really wish they get it installed this week, i have a website to finish and cant work at home.

Wednesday, October 19, 2005

pinkified dry fit

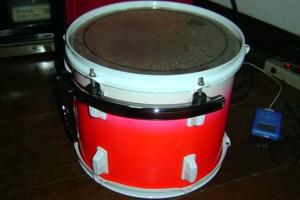
i dry fitted the hardware for the 12" to last night. i didnt really put all the lugs, just the top head with the hoop and the rims-style mount. i think im going to get the rims mount powder coated too.


bottomline, me likey!

my life just got a little harder, see my new neighbor decided to go into the food business and they happen to cook kikiam, squid balls etc really really close to where i do my spray painting. out of consideration, im now reduced to painting at 6AM daily, that's before they open. i can no longer paint during the night so that makes double the time to finish a drum.

earlier this morning, i started the first coat on the bass drum. i ran out of white cans so i couldnt do the second coat.


a few minutes later, the 13" just had another clear coat and here they are stacked

Monday, October 17, 2005

early morning chit chat

nothing to update this week, except my 12" tom is on the curing stage and the 13" will follow on tuesday. the bass and floor tom will be *pinkified tonight.

last saturday was a bummer. i almost made a double order when i made a 50% downpayment on magellan for 2 sheets of veneer, when my other supplier who's very slow in making replies suddenly thought it'd be nice to send me a little message. i made the deal with them first and i was going to get my items for the same amount as magellan's but with double the quantity. its a good thing that i was able to refund my downpayment in full from magellan. i made a promise to get some stuff from them in the near future, im thinking of doing an exotic veneer outer layer, they are the only supplier of exotic veneers that i know of. exotics, they sure are pricey.

im also getting my broadband connection at home so no more waiting till monday to post here. its a 256k line from smart wi-fi. now smart partnered with meridian telekoms to provide the gateways, smart lend its cellsites for consumer access. the first company i've worked for was a client of meridian's 3 years ago, being the lead tech guy, it was not a very good experience. im giving meridian the benefit of the doubt that maybe they have improved their service over the years. im holding my breath for now.


*yes you've seen it written here first, the new word pinkified, defined in the 2005 pimping dictionary as past tense, undergone the pinkifying process. present tense is pinkify, the process of pinking.

Friday, October 14, 2005

ranting WTF?

i just got a call from magellan veneer about my order, its going to cost me 3,454 pesos for each sheet. what im confused about is that if i buy a sheet with MDF substrate, i still pay for the same amount. i say WTF? its supposed to be 1000 bucks cheaper since im not going to pay for the extra cost of MDF backing.

im paying them a visit again tomorrow to clear this up, they must be as confused as i am with my order.

on a side note, i got a reply from alwana about my inquiry two weeks ago. alwana is another veneer supplier. i think i overshot my estimation because i asked for them to quote 500 square feet of veneer. they priced it at 25000+ bucks plus 1000 on packaging cost. i figured i only need 120 square feet to make all the drums so what the hell was i thinking?

im in order hell again, cant i just build drums without talking to confused people and slow service?

my first tom shell

ok, the pics are 5 days old but better late than sorry...whatever?!

the first one shows the finished shell clamped on the mold. i left it like that longer than usual. its been sitting there overnight.


the next one shows me trying to remove the clamps, what a thrill. boooooo.


now im measuring the thickness by using a caliper style meter thingy. its more than 5mm but less than 6 mm, i say its perfect just as computed!


so i got the shell off the mold, the magazine page was glued on the shell seams. i find it easier to clean the shell later with sand paper than to allow the shell to stick to the mold.


now here's the mold, still usable for a few more 10 inchers, its kept clean by the clear packaging tape i put on it.


and now here's the shell, its been cooking for a couple days now in my improvised oven. actually its not really an oven, its the car compartment. i did this to make sure that the glue is all dry and hard.


PS: before you make your shell, buy a car first so you can have your own personal oven too. nice huh

to sum it all up

mold
  • 1 hour to cut the blocks
  • 2 hours glueing
  • 24 hours for letting the glue harden
  • 277 pesos for 2x4x8 wood

shell

  • 5 minutes to compute lengths
  • 1 hour to cut the plies into exact sizes and stick them side by side using masking tape
  • 5 days of glueing all the nine plies together. it took more time for clamping the actual work involve which i can peg at about 6 hours total.
  • 567 pesos for 7 strips of 4"x9' raw maple veneer, i used 5 only.
  • 84 pesos for the pva wood glue

cant wait for tomorrow, im going to take it to the wood shop and have them cut it to size because im lazy to do that manually. this is as far as this shell goes, it wont be a finished drum. still waiting for my 4'x8' sheets of veneer though, cant begin on the new 10" and the rest of the kit.

Tuesday, October 11, 2005

going for gloss

i got two messages asking how i did my gloss finish so here it is. i also put more thought into this than what i sent to those guys which was hastily written. so zig and marion this is the best explanation i can come up with.

i left off after priming so if you havent read that part yet, better do so now. let your hands rest first after all the sanding before you start spray painting.

so your shell has been primed and smoothed with putty. time to get some lacquer paint. this is the part where it gets expensive. i used spray cans to apply the color and the clear coat. i used only one brand, pylox because its cheap and consistent. i know some might think that i should have used a compressor/HVLP system but i dont have a compressor or HVLP gun. now that will be a sizeable investment for a one time project dont you think?

i used two cans of pure white (no. 100) , two cans of flourescent pink and two cans of clear already for the 12" and 13" toms. i think i need 4 more the 16" tom and bass drum plus 3 pink. the clear coat, now that's expensive, i estimate about 6 cans for the two remaining drums. all in all, you get 6 cans of pure white, 5 for pink and 8 for clear coat for a total of 19 cans multiplied by 140 pesos. well you get the idea. at least i dont have to clean up anything as opposed to using a gun and compressor.

you'll also need several grits of sand paper, personally i choose 400, 600, 1000, 1500 and 2000. there other guides out there that will give you a different configuration but this worked fine for me. they will all be used for wet sanding.

there are several things to remember:
  1. i found out the hard way that you cant use lacquer over polyurethane, the lacquer will react with the poly making the coat bubble like crazy and leave a flake finish when dried. dont ever use polyurethane over lacquer as poly will leave a yellowish tint when you apply it and still be there when it dries. i havent tried non-yellowing polyurethane yet but as a simple rule of thumb: use lacquer all the way, poly vice versa, dont mix them.
  2. dont apply more than 2 coats a day for lacquer. i tried to apply 10 coats in one whole day and when the lacquer dried, it shrank leaving me with stretch marks on the surface of the drum. good thing the stretch marks were covered when i installed the snare head. 2 coats a day is on the safe side, i do one coat in the morning before i go to the office and one coat when i go home. simple rule.
  3. when using lacquer, do it in a properly ventilated area, it smells bad and is bad for your health. but dont spray lacquer on a dusty place or non-cemented ground. you dont want dust particles to stick on the lacquer as it dries.

i learned all of these reminders from the school of hard knocks. as i mentioned before, i dont know any better about painting but at least now i do.

before you start painting, make sure you have something to hang the shell with. you need to go around the shell so you need it to be mobile. i used cymbal stand covered it with newspaper. i hung the shell like so:

of course you cant spray on the whole perimeter of the shell this way with one pass. i had to rotate the shell four times.

on my first attempts, i did used a lazy susan. its nice and fast if you want to apply paint on the whole shell but i found it difficult for making edge fades. i just found it comfortable to do the fade with the shell vertical. i dont know about the others.

lazy susan is not a person, its the small rotating platform on top of those big dining tables. you can make an improvised version using two panels of plywood nailed loosely on the center or you can buy the metal ring from ace hardware/handyman/true value.

now that we are all setup, its time to spray on the first white coat. i did 2 coats per drum ensuring it is applied thinly and that the can is 8" away from the shell. white is the standard choice for first coats because it will allow your (future) color coats to really bring out their best shade. some spray cans will instruct you to hold the can about 12" away but i found this too wasteful. 8" is as near as you can get for a good coat with minimal waste and no paint runs.

applying the white paint is easy, just go around the whole shell. now let's do the fade. i dont have a pic of me applying the paint so here's an improvised pic on where to position the can when doing the fade:

i positioned my spray can about 8 to 10 inches diagonally from the opposite edge of the shell. a couple more inches farther and you'll get unwanted color mist over your white background. i did two light coats to achieve the green fade.

to increase the fade color's width (similar to the pink finish), just aim inwards maintaining the distance and angle of the can.

when you are finally satisfied with your color, the next step is to protect that with clear coats. this series of repeating steps will determine a glossy finish or a crappy one. its quite simple but tedious. apply 3 coats of clear first and then wet sand it with 400 grit. dont rub the clear too much or you might destroy your finish color. too much is when you look at your sand paper and you see the paint you used on it. remember the goal is to remove bumps/high spots and level the lacquer by sanding.

after wet sanding the first 3 coats, you'll see portions where there are dark spots. these dark spots are natural and its what we want to remove anyway. now get your clear spray can again and do 3 more coats then wet sand it again with 600 grit. just do 3 coats and then wet sand it with the next higher grit. when you get to 2000 you wont hardly see the black spots you've seen after the first 3 coats. what you'll get is a smooth surface full of fine scratches that it makes the shell look dull, non-glossy, just plain boring. leave it that way for 1 month.

this is the lacquer curing stage, some might argue that lacquer doesnt really cure, what the heck am i talking about? im simply saying that you should let the lacquer harden for a while. how do you know if its already cured/hard? simple, if you dont smell the lacquer anymore then its cured. it takes about a month. dont attach the lugs yet during this wait period, dont play your drums or you will waste all your money and effort.

after 1 month, get yourself some swirl remover and carnuba wax. buy it from the big hardware chains on the malls or if you have a neighbor with a car, ask if he has some. i use turtle wax swirl remover and carnuba wax. apply swirl remover on your shell and it will give the gloss to your dull, lifeless shell. satisfied yet? finally apply the carnuba wax to protect the gloss. attach your lugs, the head and the hoops.

badabing badaboom that's the it!

Monday, October 10, 2005

at last, delicious veneers

want 8'x4' sheets of veneer? go to magellan veneer at pasong tamo extension hehehe. (shameless plug). well i visited their showroom (called borders) and ordered myself 2 sheets of maple veneer. i dont know exactly how much they will cost me but i know that it is less than 3400 pesos each.

they also gave me a sampler pack of the the veneers they carry.


i think i like the figured anegre the most and will make a killer drum finish but damn expensive. its the one in the middle with the wavvy features. damn nice up close. walnut is another nice wood that i would like to try someday along with cherry. nice grains, perfect for natural glossy and satin finishes.

burls start at 30k pesos per 8'x4' sheet so i definitely cant build a mappa burl kit. way over budget.

the shell

its finished in 8-ply all horizontal grain configuration. its also butt-ugly because i havent had the time to remove the excess glue and sand it smooth. i dont have a table saw at home so i have to bring it to a wood shop to cut it down to 7" deep.

ok, i haven't downloaded my finished shell pic yet but i hope this will do for now. this is how the shell looks like after 4 plies. i am about to close the seams on this one.


i did two things to the mold: i added a piece of wood and packaging tape for a smoother surface.

the piece of wood helps me align the shell with the mold. its a small thing but does a very big job. i screwed that wood on one end of the mold to act as a stopped. all i have to do is push the new ply against that stopper and stack the shell over it while also pushing and voila, alignment achieved. it rotates too so i can get it out of the way if need be like when im cleaning excess glue that got transferred on the mold.


the packaging tape is wrapped around the surfaces of the mold. this is to ensure that the glue doesnt destroy the mold and allows me for faster cleanup. even if i do use glossy magazine pages as a 'glue catcher' its still not enough. the packaging tape is important.

Friday, October 07, 2005

friday my day

OT: yesterday, i got my first modern drummer issue since i subcribed last june 22. its ringo starr on the cover and its a really interesting to read on how he does what he does.

i know, time to post some more progressive pics. this will get a lot more interesting in a couple of days. yeah really.

here is the mold i made with the compass thingy, im gluing them first by pairs and then glue the pairs together. i forgot to buy a 10" clamp to hold them together but its too late go to shopping. i used cans of paint on top each part of the mold just to apply pressure. you can see this on the concave part.


now let's go off to the more interesting part which is preparing the veneer plies for glueing.

step 1. since i only have 4" wide strips, i have to use strips side by side cut to the proper length of the shell's inner diameter. then prepare the second ply the same way but must be a couple of millimeters longer than the first. i have an excel file to calculate the exact lengths but i havent added the glue thickness on the computation yet. i'll post the excel file too as soon as i get some measurements.


so crude, i used masking tape to join the strips side by side but hey, it works can you argue with that?

step 2: apply glue on one side of the first or second ply, doesnt matter which one as long as you do it on the area that will be clamped. do it fast too because the glue wont wait for you.


i used a piece of cardboard 4"x4" to apply the glue in an even fashion. from the pic above, i aligned the two sheets with the shorter sheet on top. i then used some paper on the bottom and top of the plies. this is just to make sure that the veneers dont get glued to the mold. what's amazing is that the paper doesn't seem to stick on the veneer too. im using a weird glue. put the clamps on both sides nice and tight. then wait for 30 minutes for the glue to settle.

step 3. after 30 minutes, remove the clamps from the mold and behold, the veneer retained the shape of the mold.


here's another one with the sheet turned over


step 4. close the inner ply first. as you can see, there's a shell forming. all you have to do after that is to add more plies on top. simple.


here's a close up of the mold and clamp


i have to give credit to the guy who wrote a guide on this and for answering my emails, a very special thanks to mr. massimiliano signori.

Wednesday, October 05, 2005

to good to be true

i just got of the phone with a representative from magellan veneer and it seems i can get 4'x8' sheets of raw maple veneer. im going to their showroom this saturday to check out some samples. it seems my veneer strips will end up for a 10x4 aux snare. excited, with 3400 pesos i can build a 10", 12", 14" and 18" bass drum! hmmmm

dont want to get my hopes up too soon...

shell mold update

the first mold i made was very inconsistent, the only way to make the arched surfaces smooth and level is by using a wood rasp or sanding the heck out of it. now doing that wont guarantee the arc to stay at the correct radius so i better redo the mold before i actually use it. let's just call it alpha version.

wonder how i made the alpha? well, first things first, shells are 1/8" undersized so if you buy a 14" you actually get 13 and 7/8" so they say over at forum.drumshed.org. kellers are done this way.

so my target size is for a 10" tom with a shell thickness of 2/8". that would give me 9 and 9 7/8" outer diameter and 9 and 3/8" inner diameter. why not 9 5/8" you say? because we are talking about diameter and you have to subtract the thickness twice. here's an illustration:


you just divide the inner diameter by 2 to get the radius for the mold. but i converted to the metric system (in millimeter to be precise) so i can easily and accurately measure the arc. i drew the circle on a piece of paper and cut it out as a template for the wood block. this method was actually suggested to me by massimiliano signori, he's italian and he's the one who showed me how to do the shell. although we never met personally before, we had a series of email exchanges along with it an english version of a how-to guide he made for me to follow.

now back to the paper template, well you just use the paper as a template and draw on the wood blocks. then use a power jigsaw to cut along the lines, glue the blocks together to form the mold. what you get is exactly on the second pic of my last post. simple isnt it? the first problem is getting a consistent and repeatable cut. remember you have to cut several blocks for the depth you want and its a pain in the poopoo to do it freehand. there's got to be a better way of doing this!

well, as i mentioned before, i have a day job which a do nothing for 9 hours so i did research on the internet and saw a couple of pics for inspiration. now comes the beta mold...this alpha-beta stuff is way overused, sounds corny, anyway...i created a compass-like thingy using some scrap wood to hold the block in position and the jigsaw mounted on a plywood upside down blah blah blah. you'll get the idea on these pics below:

here are pics of the thingy:


the jigsaw and the base with graduated holes


the base and the arm, you can see that the holes are marked for 10, 12, 14, 16, 18, 20 and 22 so i can cut molds for those diameters too by just moving the screw to the appropriate holes =)


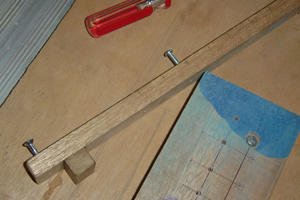
here's a solo of the arm. i put a 1"x1" stopper for easy alignment of blocks. i'll just screw the block tight and its ready for cutting


here's the thingy in action, cutting a 10" mold


look, clean convex cut


here's the whole block and the convex part removed from the arm


cant wait for saturday...

Monday, October 03, 2005

weekend madness

ok, here's a couple more projects on the works as if i have any more money to fund them all.

think OCDP! ha! its the old metal snare drum that came with my maya kit. i dont use it anymore ever since i broke the strainer. it gathered dust and rust for more than 2 years and now its back. i brought it to the versa for powder coating along with the lugs and hoops. i dont have the money to get new heads and a snare wire yet nor can i find a strainer that will fit the holes.

im thinking of selling this one:


and now for the big one, my most ambitious project yet:

the mold plus


raw veneer strips equals


a locally made shell!

the mold still needs a lot of work and im starting with a 10". i can make upto 9"-deep toms on that mold. hmmm made to order shells, i wonder if i can make a profit out of this.

the veneer strips are 4" by 9' maple, i couldnt get a source for wider strips so i went back to formaply and bought them anyway. one thing i cant do is make a natural finish out of the shell because of the seams. anyway, that's why im perfecting my painting skills.

more on this soon. promise. really.

priming

i dont know about paints. when i started to make speaker cabinets a long time ago, i would pile on the gloss or flat enamel on bare wood hoping to achieve a smooth finish. well, i applied coat after coat and end up dissatisfied. i discovered 'masilya' or plasolux putty used by the local painters and soon tried using it with great results.

i never got the art of painting down till i was in college and i have never learned so much as before i started out hanging on forum.drumshed.org. so what's the schinizzle on paints?

sand the wood smooth first. then apply primer using a brush, spray or roller. i did mine using rollers. why? because its very fast, evenly-applied and cheap. of course you can spray the primer but then i have to invest on a compressor and gun or pay some guy to do it. whatever method you use doesnt matter since we are still going to sand the primer and apply putty. also, use white primer if available, white helps bring out whatever color you want on top.

why put primer? well primers have high solid contents that if you apply them on wood, they close the wood grains. before i used putty, i pile on the paint to get a glossy effect but i noticed that the paint sips through the wood so you have to do several coats of paint. by using a primer first, you can settle for one or coats of paint because the paint is no longer sucked by the wood.

here's a pick of two shells with primer, the left one already has putty and the right one had its first coat of primer:


notice the one on the left is actually smoother because of the putty.

now you dont have to apply another coat of primer, well for me at least. its really personal preference if you want to use more than one coat of primer.

here is another pic of the covered tom holders of the bass drum without putty yet. oh yeah before i forget, you have to sand the primer too before applying putty.


then after your first putty coat, sand the shell again before applying another coat of putty. do this until you are satisfied. i had to do this 4 times to get a very even surface.

next step is applying the color.